Programming a 2D Puzzle-Platformer
- Harshita Shetye
- Jun 11, 2025
- 6 min read

Updated: Jun 11, 2025
Gaze is a 2D puzzle platformer where you play as Medusa, turning enemies to stone to solve clever environmental puzzles.
My work included:
Audio – Integrated Wwise for dynamic sound (attenuation, fades, pitch shifts)
AI – Built a Finite State Machine enemy system for smooth state transitions
VFX – Added particle effects & shaders (like Gaussian blur) for polish
Integration – Brought together art, audio & design assets into Unity
To explore the design philosophy and the 'why' behind these technical solutions, check out the full design case study, where I break down the core mechanics and player experience goals.
Tech Stack & Tools
Engine: Unity 6
Version Control: GitHub with LFS
Audio Middleware: Wwise 2024, AkUnitySoundEngine to integrate adaptive audio and control transitions in real time.
Built-in Tools: Cinemachine, Unity's in-built tool for smooth and dynamic camera movement.
This post breaks down the core technical systems I built for "Gaze," a 2D puzzle-platformer made in Unity 6. Below, I detail my approach to the physics and collision systems, the Wwise audio implementation, and the camera and shader effects that brought the game to life.
Collision & Physics System
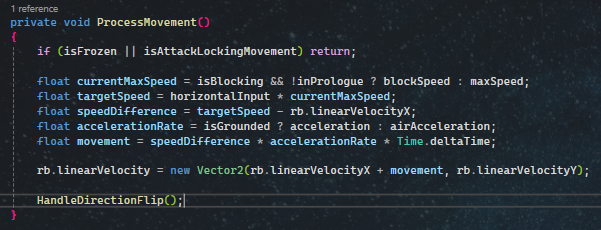
Achieving a perfect sync between player movement and collision detection was an iterative process that took weeks to perfect.

For the Player:
I began by adding a Tilemap Collider 2D to the ground tiles and assigned them to a "Ground" layer.
A dedicated "Ground Check" GameObject was placed just below the player's feet to constantly verify if they were grounded.
I used a Capsule Collider 2D with a frictionless Physics Material 2D to prevent the common issue of the player "sticking" to walls or ledges.
A final "Wall Check" was implemented to prevent physics glitches that could push the player through solid objects.
For the Enemies:
Enemies were kept on their designated paths using a separate "Patrol" layer of tiles on top of the main ground.
Their colliders were designed to be distinct from the player's, allowing the player to jump on top of them.
When an enemy is petrified, its layer dynamically changes to "Ground," allowing the player to seamlessly use it as a platform.
Tuning the "Game Feel"

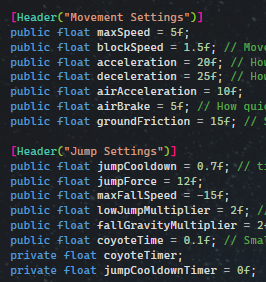

To ensure the movement felt smooth and fair, I referenced professional platformer techniques and implemented several key systems:
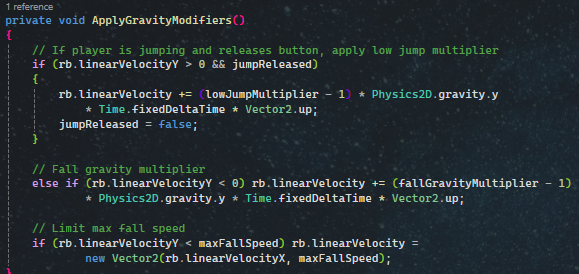
Coyote Time: To give players a small window to jump even after leaving a ledge, making the controls feel more forgiving.
Variable Jump Height: Using jump and fall multipliers to give the player more nuanced control over their movement in the air.
Precise Ground Movement: Carefully tuning friction, acceleration, and deceleration to prevent the character from feeling slippery.
Air Control: Limiting horizontal movement while airborne to keep jumping strategic.
Building Dynamic Soundscapes with Wwise
I was responsible for the full technical implementation of the audio, using Wwise and the AkUnitySoundEngine to create an adaptive and immersive soundscape.
Core Wwise Functions Used:
LoadBank(): To load the single sound bank containing all game events.
PostEvent() & StopPlayingID(): To play and stop specific events, with optional fade-outs to prevent abrupt audio cuts.
SetRTCPValue(): To dynamically adjust parameters in real-time, such as linking footstep volume directly to the player's movement speed.
RegisterGameObj(): To register objects with the sound engine, allowing for distance-based effects like attenuation on sound sources like waterfalls.


When changing levels, audio transition is handled smoothly by fading out of the previous background music before loading into the new level. Then, fading into the new background music.
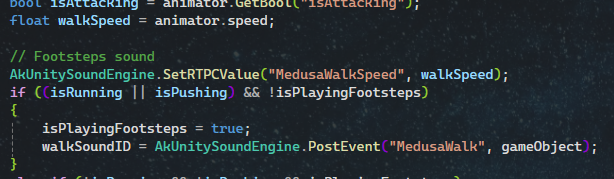
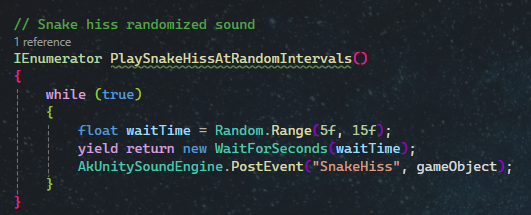
Inside the Wwise Project, events were set up, including the RandomContainer type of Event for Medusa's Walk sound effects.
To sync the audio with Medusa's walk speed accurately, I set the Volume of the sound effect to play on Medusa's walk speed. Thus, whenever Medusa walked, it played a random sound from the container.
Distance-Based Attenuation
To make environmental sounds feel natural, I wrote a custom script to handle volume based on the player's distance from the source.

The 2D distance between the sound source (ex: waterfall) and the player is taken.
Volume fades away with distance
This is done by first taking the normalized distance between the minimum distance (full volume) and max distance + fade out buffer (0 volume) by doing an InverseLerp.
Then, this normalized value is inverted (1 – x). Inverting causes the volume to decrease as the player moves away.
Volume boosts as player gets closer to the source. This is done with linear interpolation:
Lerp(maxBoost, 1.f, normalizedDistance 2): maxBoost is a multiplier to boost up the volume even more. The 2 accelerates the fade-out process out of the maxBoost as the player moves away.
The final volume is then clamped in [0, 1] and scaled to match Wwise's RTPC volume range [0-100].
Finally, the sound plays based on the player's distance with a small buffer applied to avoid abrupt cuts in volume.
Enhancing immersion with Camera & Shaders
Solving Camera Challenges with Cinemachine
Initially, I attempted to code the camera movement manually but struggled to make it feel perfectly smooth. Switching to Unity's built-in Cinemachine tool was a huge time-saver and produced better results. It allowed me to easily:
Implement smooth player following.
Create "dead zones" to keep the camera steady during small movements.
Confine the camera to level boundaries.
Add effects like screen shake (using GenerateImpulse()) and chromatic aberration when the player gets hit.
Cinemachine: Chromatic Aberration


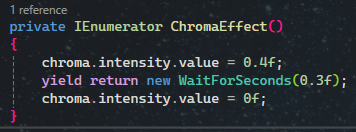

To add the screenshake effect with a simple red background Chromatic Aberration, I:
Created a Global Volume Profile with 0 intensity as default
Added a Post-Process Layer and Cinemachine Impulse Listener on the Camera (impulseSource).
When Player collided with the Enemy, the camera would trigger a GenerateImpulse() in-built function, which would apply the Amplitude Gain and cause a camera shake effect
Creating Depth with a Custom Gaussian Blur Shader
To make the foreground pop and to enhance the game's dark, cavernous atmosphere, I wrote an Unlit shader to apply a Gaussian blur to the background tile layers.


The shader was designed to:
Render first by being placed in the "Background" queue.
Not write to the depth buffer (ZWrite Off), allowing foreground objects to always draw over it.
Perform a 7-texel sampling blur (center + cardinal and diagonal directions) to create a smooth, feathered effect.
Darken the final color to create a sense of depth and mood.
Visual Effects for Immersion
Version Control & QA
A smooth workflow is just as important as the code itself.
Version Control: Our team initially used Perforce but encountered technical issues. I led the strategic decision to migrate to GitHub, which resolved the problems and allowed me to focus on core programming tasks.
QA & Bug Fixing: I worked closely with our QA Tester, using a version tracking form to log changes and receive detailed bug reports after each build. This created a structured and efficient pipeline for identifying and fixing issues.


Challenges Faced
Every project is a learning experience, and "Gaze" was no exception. We navigated several common development hurdles that provided valuable lessons for future teamwork.
1. Communication & Role Clarity: Our initial challenge was maintaining clear and consistent communication. Fragmented decision-making sometimes arose from inconsistent meeting attendance. We also navigated some role ambiguity during the project.
Key Takeaway: This experience highlighted the importance of defining primary roles at the very start and establishing a robust communication pipeline, whether through flexible meeting times or structured project management tools like Trello or Jira.
2. Maintaining Creative Momentum: After the initial excitement of brainstorming, we experienced a dip in energy as we worked through creative compromises. Similarly, our initial audio direction didn't quite match the game's tone.
Key Takeaway: We learned that aligning on a project's mood and feel with clear references (like mood boards and music tracks) upfront is crucial. Regular mid-project check-ins are also vital for keeping team morale high and ensuring everyone feels their creative voice is heard.
Personal Retrospective
On a personal level, this project was a fantastic opportunity to deepen my understanding of the entire development pipeline, from the fundamentals of pixel art to the intricacies of what makes a platformer's movement feel great.
Looking ahead, I'm excited to build on this foundation. My next technical goals are to master Unity's 2D Pixel Perfect camera tools and dive deeper into writing custom shaders to create unique visual effects. This project reinforced my passion for not just building systems, but ensuring they contribute to a polished and cohesive final product.

Comments